Friday, December 30, 2011

Last post in 2011.

Last days of 2011.

I just want to thank you all for any kind of connection we've had in 2011. It has been a great year for me, and I had quite a production the last weeks before Christmas. Below you see most of the pot coasters I made. I think two or three are missing here.


I also made some knittingneedle and hook holders, and they became a mistery for some of those who recieved one. I didn't include written words on how to use them and my Mum and Moster didn't understand what it was. We have had some good laughs about that later on.


They are made of very fine leather, soft as glove-leather. Originally ment to use on buttons. Inside I lined them with fabric and the knitted plaits.


I added a tapestry needle and a measure for knittingneedles. I wonder what the two of them thought it to be. I'll have to ask them some time.
Below you can see how it looks when in use. A friend of mine saw them before Christmas and she immediately said " what luxury". That was because of the softness of the leather.


I've had a nice Christmas and handyman and I are going to celebrate the new year alone. Because we want it that way. Sandra has been here for some days now but will return home tomorrow. She got her own laptop for Christmas and, I expect the question on how to make her own blog will turn up sooner or later.
Since this is my last post this year I want to wish you all a Happy new year!
Take care when using the fireworks!!

Monday, December 19, 2011

Finally some paint on my fingers again!


Making my own tags.

I've had some good days now wrapping gifts. I ended up making my own tags this year and I had lots of fun doing so.
They are easy to make out of empty toiletpaper tubes. I have this little tool to cut out my tags and then I gessoed them before painting and writing.
The hardest thing was to get the "eye" sentered, but they are quite charming with the "eye" a bit out of center too.
To make the tags I start to cut the tubes and water (spray) them to get them flat. Then they need to dry before cutting and painting.


Now I want to share with you some of my favorite Christmas drawings/ paintings ever. They are created by a Norwegian named Anders Midthun.
These images are so "Christmasy" to me and I never get bored looking at them. Do you have any favorites for Christmas?
I hope you all are doing well and that you're not too stressed.


Finally I wish you all a Merry Christmas or should I say Happy Christmas or even Happy holidays. I've been reading that there are some discussions on how to put the greetings. In any case mine are heartfelt and well ment.
Take good care!!


Friday, December 16, 2011

Life is good!

I'm all done and ready for Christmas.

Yesterday one of my good friends came over and gave me this huge bunch of tulips. I love tulips and was soooooo glad to recieve them.
For the first time in my life as an adult I've had a calm Advent, and now over a week before Christmas eve I'm done!! It feels gooood!


How are you doing? Are you ready too, or nearly.

Have a good weekend everyone.

Friday, December 9, 2011

Nearly done!

Just a little post to say hello.

I'm still here, and today I'll pop in and say hello. I'm one day ahead of my flow sheet and proud. Yesterday I finally cleaned up my sewing studio and felt like loosing 10 kg's. Today I'm doing my tiny new studio and then it's just small things remaining.
Coming weekend I'll probably decorate for Christmas, and coming week I have some baking to do. After that I shall enjoy wrapping presents and handmake the tags. I'm nearly done with the handmade gifts too, so this season is a good one.
Below you see mine and Sandras sewingspace. I'm standing in the dooropening.


Next one is better to see the space.


And this is what's behind my back when ssewing. I own far too much and have decided to give away some of it. My nieces need something to practice on, so I hope they will come and take away something.


Next picture shows the tiny room with my cutting table, as you see it's loaded and I promise it's very tidy now.

Here you see the angles of the room.


And a small window.


That's all for today, I'm off for some more job.
Have a nice weekend everyone and thanks for visiting.

Saturday, December 3, 2011

Small things to give away.

I had a little spare time yesterday.

The whole thing started with the squared one. I wanted to try if I could knit this design. Yes I could, but it was too slow to make for Christmas besides a lot of people in my family do knit themselves. Not that many crocheting though. So I chose to crochet instead and it's much faster too. These are not potholders but hot pot coasters. You know to protect the bench or table from hot pots.
I've chosen to make them colourful just to brighten any grey day. I'm planning to give one to each family in my family,as a small gift. Perhaps that will inspire the girls to start crocheting. That would be fun.


Today I'm going to polish all the doorhandles. Every door in our house have brass handles, old real brass. There are quite a few to do so that will be my job today. Tomorrow will be the day for the silvervare. Oh, the forks are difficult to polish.
The roast has to be put into sour too if I'm going to get it ready for Christmas. Baking will be done later on. Coming week will be all about cleaning/washing.
And this year my mom is coming home for Christmas so I'll have to pay her a visit or two too.
Because of my mom we are all going to celebrate Christmas together this year and that mean that we will be more than 30 persons at Christmaseve. Amongst them are 11 great grandchildren.

I'm off to polish, have a nice weekend.

Thursday, December 1, 2011

In progress.

A little progress in my work.

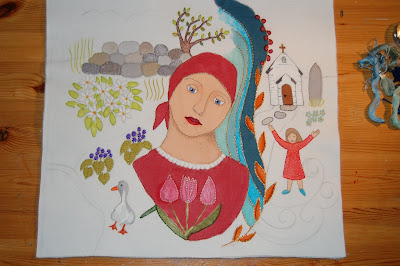
I've been working on a larger piece lately. It took me almost a week to sew the outlines and all of them are not done yet. I'll have to wait and see when the colours are done. My photo shows how far I've come and now I'm stuck.


The lower part has become a nut to me. I had it all so clear, but now I'll have to rethink. I don't want to mess it up. I'll have to put it aside in any case, Christmas is calling. During the preparations I shall chew on it.

I have this good friend who is so supportive, she is cheering at me all the time. Otherwise I probably would have thrown this piece away several days ago.
That's about it for today. Enjoy your Advent time.

Monday, November 28, 2011

In my mailbox.


Look what I got in my mailbox the other day.


I had the incredible luck to recieve this beautiful card in the mail some days ago. It's handmade by a 8 year old girl from Russia. Her name is Lyuba and she and her mum reads my blog from time to time. Her mum tells me that Lyuba gets so inspired from that and is dreaming of doing some of the things I'm doing. How inspiring is that for me? It warms my heart to know that I actually inspire others. Isn't that what this is all about, to inspire and get inspired. Well, at least a part of it is.
I'm so impressed by this girl, 8 years old and already familiar to embroidery, not an easy one either. I remember when I was at her age, my embroideries were not that intricate. I'm sure she will increase her creative abilities and become a free singing spirit in the future. You go Lyuba, I'm cheering on you.


Have a closer look, isn't this incredible for an 8 year old?


And read this heartmelting message. Many many thanks Lyuba, I really appreciate you doing this for me. And, keep an eye on your mailbox too. :-)


--------------------------------------------------------------------------


Just a little sneak peak of what I'm working on right now. The photo shows just a tiny part of it. The whole piece measures 70 by 70 cms. I have just started the embroidery work. It's all handsewn. So looking forward to start the painting.

Just this little report from my part of the world. What's going on in yours?

Have a creative week.

Friday, November 25, 2011

A couple of faces.

This has been such a fun week.

This week will always be remembered as fun and intense. I've been painting and experimenting all week. It was such a relief to finally find a way of doing things that fit my hands.
This way of doing it allows me to add some more to it than I could on an ordinary canvas. That little extra makes the differens to me.
When handyman and I went for buying the frame to my first piece, I even baught 2 more. One small and one medium size. Now, at the end of the week I have filled them with faces.
This way of doing it demands a certain size of my work and the smallest frame felt a bit too small. Tiny details are not easy to embroider and then paint so I prefer the medium to be the smallest one to work in. Never say never though, the future will show.

Below you see what I did in the smallest one. It's called : Flow (in Norwegian: Flyt ) To begin with I thought it would be difficult to get a face done, but to my big surprise it isn't. One can always discuss the motif, but I'm very pleased with how the face ended up like. Have a close look at her nose, that is the best part.


Next I'm going to show you the complete process, how I'm doing it. This work fits the medium frame.
This painting is called : Pieces (Norwegian: Brikker )

First of all I'm drawing my piece on paper and transfer it to the fabric. Then I embroider the outlines. In this specific one there was not many colours to embroider, sinse I decided to make the square lines black. Below is the embroidered piece. (with the eye painted because I couldn't wait.) Look at this profile, I think that a stronge power than mine guided my hand when I was drawing this. :-) As you understand I'm very pleased with it.


The reverse side, just to show you that I don't bother how it looks. This side will not be showing in any case.


The most exciting moment is when the first layer of colour is done. How will it look? This one is strongly coloured. And dull hair.


Now it's time to fulfill the squares. The result was not quite like what I had thought but still I saw that it could work. The hair became even worse with this try.


Back to brown hair again. I don't like the hair even when finished, but the hair is not the main thing here so I let it pass. At this stage I'm quite pleased with my piece, but felt the lack of something. What I decided to do could either ruin it or make it look like I was aiming for.


When the "lining " was done I was not quite that pleased as I wanted to be. I set the whole piece away for a while .

The final piece looks like this. I added some gold/yellow in front of her face and that was just what I was looking for. It's done!


The next one will be a larger one. I'm still learning but it's a joyful road.

Have a nice weekend and take good care.

Wednesday, November 23, 2011

Just like coming home.


Hello, it has been a pleasure doing this piece, and I'm very pleased with how it turned out. I'm going to do more of this. This was my very first and counts as a test but I so much like it that I've framed it. It measures 40 by 40 centimeters, frame 50 by 50.

I used a cotton fabric, drew the motifs and painted them with acrylics. When dry I embroidered the outlines. Some of the outlines were done before painting, and I think that's the best way of doing it. In some way the thread stopped the paint from floating all over. The paint was much thinned by water.

The combo of paint and stitches suites me so well, it felt like coming home. Right now I'm planning some new pieces. A special friend of mine came to visit yesterday and she loved my piece too. She start to talk about exhibitions and stuff, I had to laugh. Right now it's enough playing and making.
You remember the startpoint.


This is how it looked with some more colour on. I was a bit uncertain whether to paint the whole piece. Would I kill it with paint all over?


The finished piece. The colours looks soooo dusty here, but in person they are bright and clear. It seems impossible to get a good photo with the frame on so I skip that. The frame is stright and black. (IKEA)


Absolutely not killed and I'm pleased. I used a bit of metallic threads and they really get the motif stand out. I've used diffrernt threads/floss at different parts of the piece. Some to underline the shapes and some to make them stand out.

I'm not over the top pleased with the pond but for a start it's working.
Finally, should it be called anything? " My first"? If you have any good suggestions I would appreciate hearing them.

Have a creative day and take care.

This is how it looks framed hanging on my wall.


Saturday, November 19, 2011

A 30 year old idea.

Hello, are you having a nice weekend?

I really enjoy myself these days. Do you want to see what I'm up to? Well, if you're here you have no other choice. :-)

This spring/summer when we had our large cleanout I found something that I made 30 years ago. I had forgotten all about it until now. It's not that it is so wonderful but I want you to see it and understand how I came to this new idea. The rooster has no background so the whole thing feels a bit unfinished. I remember when I made it that I was pretty proud when it was finished. I had never seen anything like it, and still I've not seen that.

The rooster is framed and we used to have it on the wall when we were young and students. I simply painted the rooster on a cotton fabric and then embroidered all the lines.


It's pretty much the same thing I'm doing now. This one is just a test to see if I can make something worthwile. I have plenty of ideas to work on if I consider this try as successful. I've already discovered something to do different at the next one. As you see I've just started so it's not that easy to get a picture of how it will become when finished.

Do you recognice the main face? Yes, it is one of my faces that I transfered to this cotton fabric. The stonefence and that warped tree are typical where I live. The images on this fabric could represent the girl's life, or something like it.

I promise to show it off when finished. It will take some time though because I'm searching for the right way to do things.


Don't you think this could give some fab results? I'm just a bit afraid that I've gone too close to the edges on this one, well it's a test.
Have a good weekend and take care.

Thursday, November 17, 2011

The Hotlips.

What a fun day I had yesterday.

The weather was so nice yesterday that I went for a walk downtown. Right in the heart of our town we have this pond with a lot of different ducks and swans. And alongside a channel there is a tiny sculpture park with benches to sit down. I was there enjoying the weather and the birds, I forgot to bring my camera. Next time I will.

When back home and all the housewife stuff done, handyman and I went for our evening walk and after that I sat down with my journal. I was thinking of doing a fun face, but something different happened.
For a long time now I've had this magazine cut out and before I knew I had glued it into my journal. From there on I lost the feeling of time, and just worked in my journal. The result became a surprise to me and it's not a funny face but several.

The cut out was an image of several lipsticks and before I knew they had become a choire and of course they had to be called: The Hotlips.

This morning I did read a post written by Quinn Creative where she is talking about different sorts of people and that inspired me to make my own little wonderings about the members of my choire. If you have a good look at them, could you tell anything about their personalities? I can, and I have played with these thoughts the whole morning. It's so much fun.


It was so much fun making this page and good to get started journaling again. I've missed it.
Have a fab day and take care.

Wednesday, November 16, 2011

The other way around.

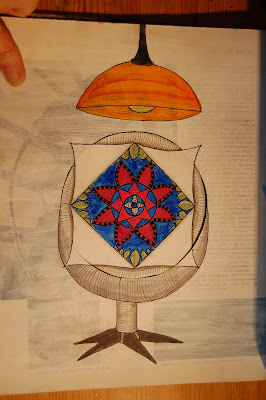
Today I'll show you what I did with the cutouts the other way around. Not something great since I didn't plan something. My focus was on the mandalas expressing my childhood summer feeling. I had totally forgotten that there would be another way to look at it.
That way I had to do the best I could come up with, and well, it's just something.

Do you remember this mandala? That's the one that make the centerpiece. I don't show you the first cutout because all I did to that was to paint it blue.


The next one I just completed the design and called it done, even without painting the background.


The following one was the funniest to make. It was the centerdesign that showed me what to do.


The last one was just half a try to make something new. Sandra called it a flying star.


I had this mandala to finish before I can fully consentrate on doing funny faces. I don't know about today though because the weather is so nice. I probably should go out to enjoy it, can be a long time before that opportunety returns.


This mandala looks far too pale in my photo, in person it's not.
I hope everyone will have an equal beautiful day as we have here. Take good care.

Monday, November 14, 2011

Funny faces.

We had a fun weekend.

This weekend handyman took Sandra to a local fair and when they returned she had this face. I had to laugh because I thaught she looked so funny. I'm not a tiger, I'm a cat she told me. This suited so well to my heading today. Funny faces.

We did some painting too this time and we settled for painting funny faces. Sunday was fathers day here so Sandra wanted to paint a piece to her moms boyfriend. She did hesitate a bit at the beginning because she couldn't draw a face, she told me. When I told her that I wanted to draw like her she was very surprised because "your drawings are much better than mine"

Perhaps one need to be a grown up to understand that. To let go of all the knowledge and just draw like a child. I'll have to practice that. I'm far too much locked up in expectations on how it really should look.

Below you see Sandras face, she has used my watersoluble crayons. She wrote the text before I noticed it, I would have suggested for her to write on a seperate sheat. With that said, I love her face. It's so free and creative. That's excactly how I want to do it.


My painting became too much "normal" drawing and too much funny painting. I'll practice!!

This is in fact my first face since the end of August, so it's still in my hand to draw a face. One of the faces I painted in August became a bit more like I'm thinking of. Back then I painted a face without any drawing at all, not easy but fun and I think it became quite expressive. Have a look here. It's the one without a headscarf I'm talking about. It's not a sweet and nice painting but the more I look at it the more I like it.

I was inspired by Janet to try this again, she always makes such beautiful faces. Have a dive into her blog and I promis you'll have some awsome moments.
I am going to make another funny face.


Have a wonderful new week and take good care!

Sunday, November 13, 2011

Heavenly taste.


This is the cake I made for my friends weddingparty.

It's called Budapest cake and is, most times, the party winner. It tastes so heavenly good and people always ask for the recipe. As you see it's more like a roll and I had to search quite a while before I found a servingdish that was long enough.
If you ever should make one cake I suggest this one. Here is what you'll need.


Plus a little jar of apricot jam.

6 eggwhites, sugar, a can of mandarines/clementines (you know,small oranges) 1 bag of vanilla powder, the one you use to make vanillasauce or vanilla cream.(contains 56 grams of powder) It's important to choose the one that need no cooking. A small amount of sliced almonds, 3 deciliter of cream (liquid to be whipped) and the apricot jam. The oven holds 170 deg. C Time in the oven is 30 min.

First thing I do is to open the can and empty it from all liquid. Then I put the "oranges" on a papertowel and put another towel on top of them. It's important to get rid of all the "outside" liquids. Set the oven too.

Start by whipping the 6 eggwhites and add 3 deciliter sugar ( little by little) during the whipping. A good tip is to leave the eggs on your bench over night. That will give you a much better result when whipping. Towards the end you add the vanilla powder too.

Use baking paper in your bakingtray. Smear your dough evenly out on the tray. Put the almonds on top and put in the middle of your oven. 30 min. 170 deg.C

This is how it looks when baked.

Now you put another paper on top and a grate (is that the right word?) and turn the whole thing upside down. Leave it this way till it's completely cold. The reason you keep it this way is that you want to maintain the damp inside. Otherwise your cake will be cracking when rolling it together.

When cold whip the cream together with 3 tablespoons of sugar.


Remove everything from the cake except the paper beneath it.


Now, add a good layer of apricot jam on top of the cake and then all your whipped cream on top of the jam. Finally you add the oranges. Now all you have to do is to roll it together. Use the paper as help when doing so.


And notice, this is NO low carb thing. :-)

Recipe

6 eggwhites
3 deciliter sugar
1 bag of vanillapowder (the one that need no cooking) (56 grams of powder)
A small amount of sliced almonds
3 deciliter of cream (liquid to be whipped) and 3 tablespoons of sugar.
1 small can of mandarines/clementines.
1 small jar of apricot jam.

30 minutes in the oven at 170 deg.Celcius.

Let me know if you try this one, and did you like the taste??

Have a joyful Sunday!